![]()
xaringanExtra is a playground of enhancements and
extensions for xaringan
slides.
Each item can be enabled separately, or load everything at once with a single call.
```{r xaringanExtra, echo=FALSE}
xaringanExtra::use_xaringan_extra(c("tile_view", "animate_css", "tachyons"))
```You can install the released version of xaringanExtra from CRAN:
install.packages("xaringanExtra")You can install the latest development version from GitHub:
# install.packages("remotes")
remotes::install_github("gadenbuie/xaringanExtra")
or from gadenbuie.r-universe.dev:
options(repos = c(
  gadenbuie = 'https://gadenbuie.r-universe.dev',
  CRAN = 'https://cloud.r-project.org'
))

install.packages('xaringanExtra')Tile view gives you a way to quickly jump between slides. Just press O (the letter O for Overview) at any point in your slideshow and the tile view appears. Click on a slide to jump to the slide, or press O to exit tile view.
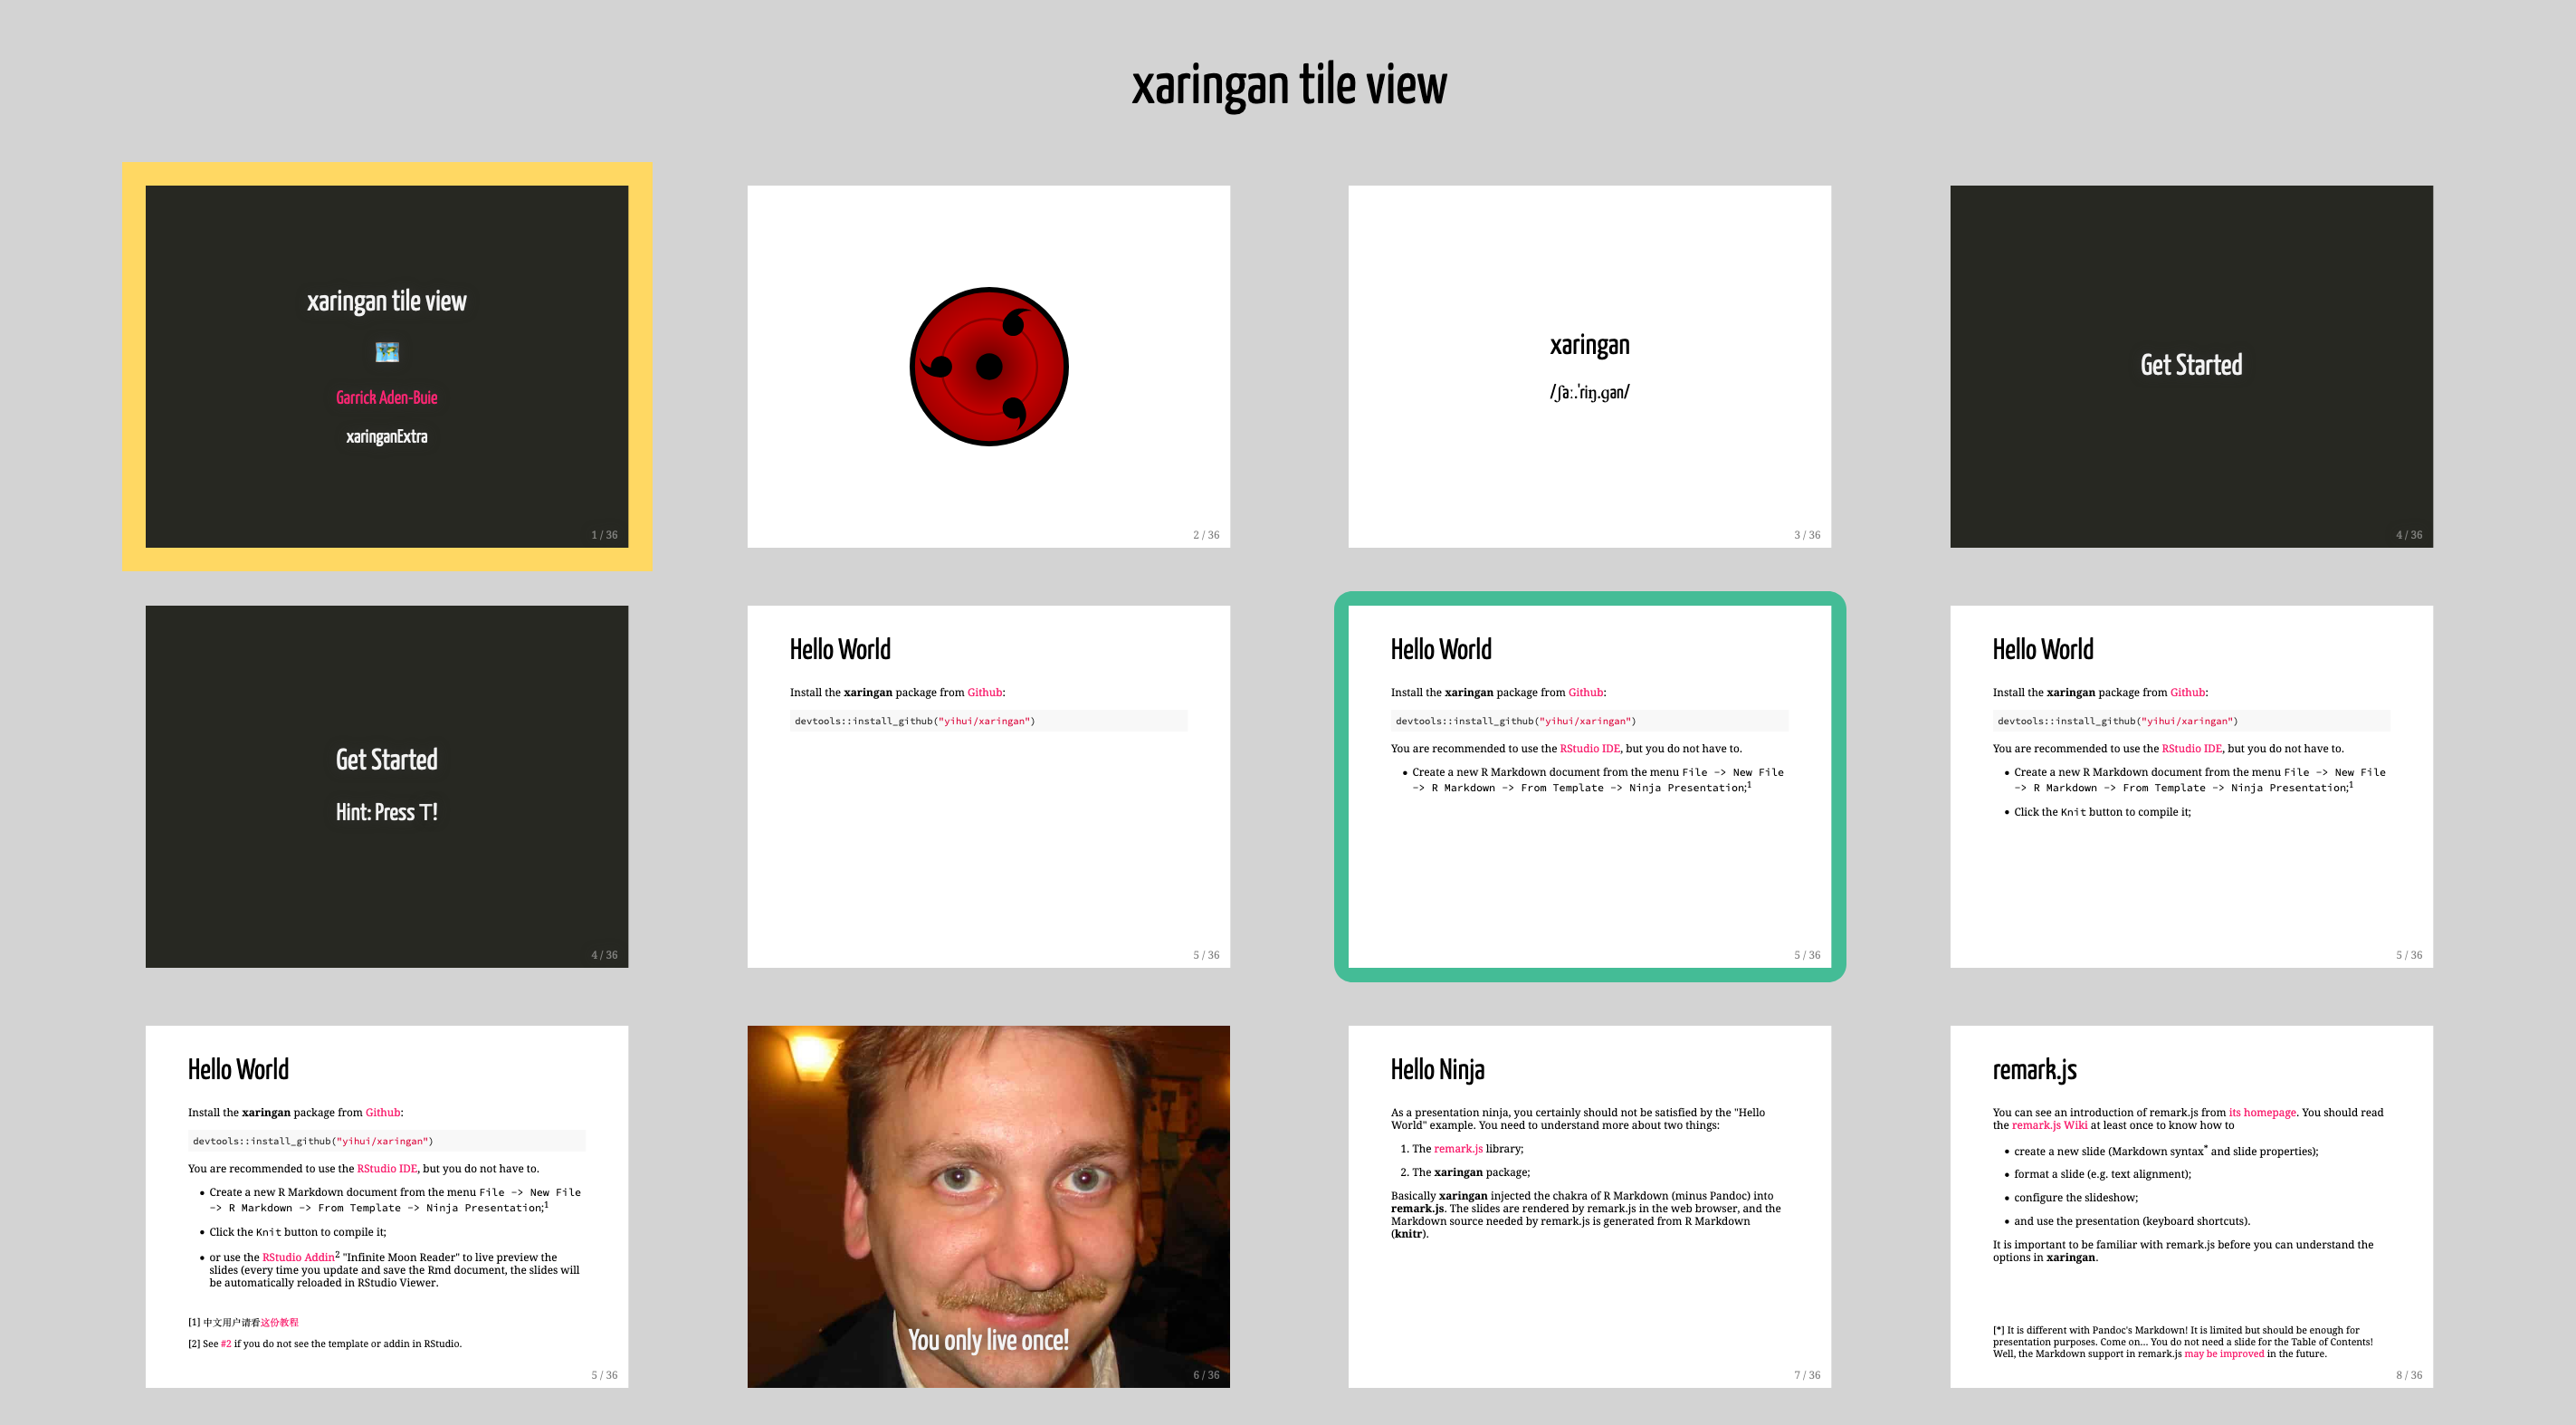
To add tile view to your xaringan presentation, add the following code chunk to your slides’ R Markdown file.
```{r xaringan-tile-view, echo=FALSE}
xaringanExtra::use_tile_view()
```
Tile view is heavily inspired by (and is essentially a port to Vanilla JavaScript of) a jQuery remarkjs hook by the same name by Stephen Hesperus.
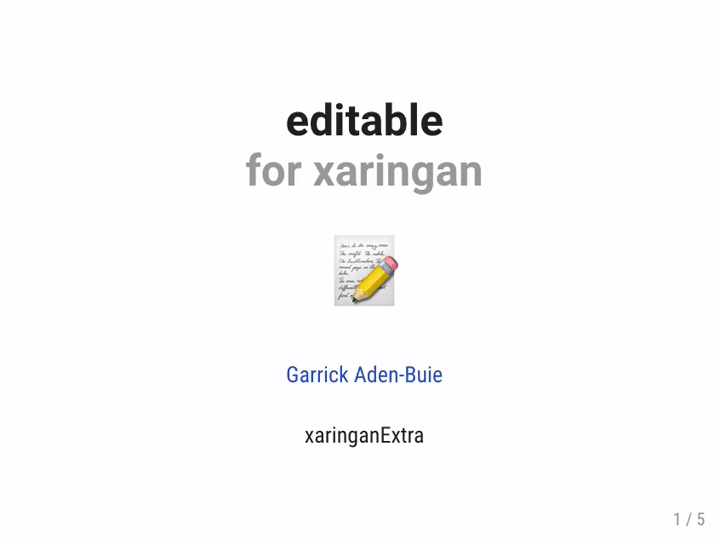
Editable gives you a way to write directly inside your slides,
updating your content live. Make any element of your slides editable by
using the .can-edit[...] class.
Make your slides editable with the following code chunk.
```{r xaringan-editable, echo=FALSE}
xaringanExtra::use_editable(expires = 1)
```
Then, to make a component of your slides editable, use the
.can-edit[] class.
## .can-edit[You can edit this slide title]Editable fields that only have the .can-edit class are
reset whenever the slides are re-loaded in your browser. If you want to
store the edited values and have them persist across browser sessions,
give each editable field a .key-<NAME> class. Be sure
to make each key unique and note that the key name must be a valid CSS
class, i.e. it cannot contain spaces.
## .can-edit.key-firstSlideTitle[Change this title and then reload the page]For more complicated HTML elements, it’s best to make only spans of text editable, such as
Hello, .can-edit[world], and welcome to my talk!or to use placeholder text.
## A few of my favorite things

.can-edit.key-likes[
- thing one
- thing two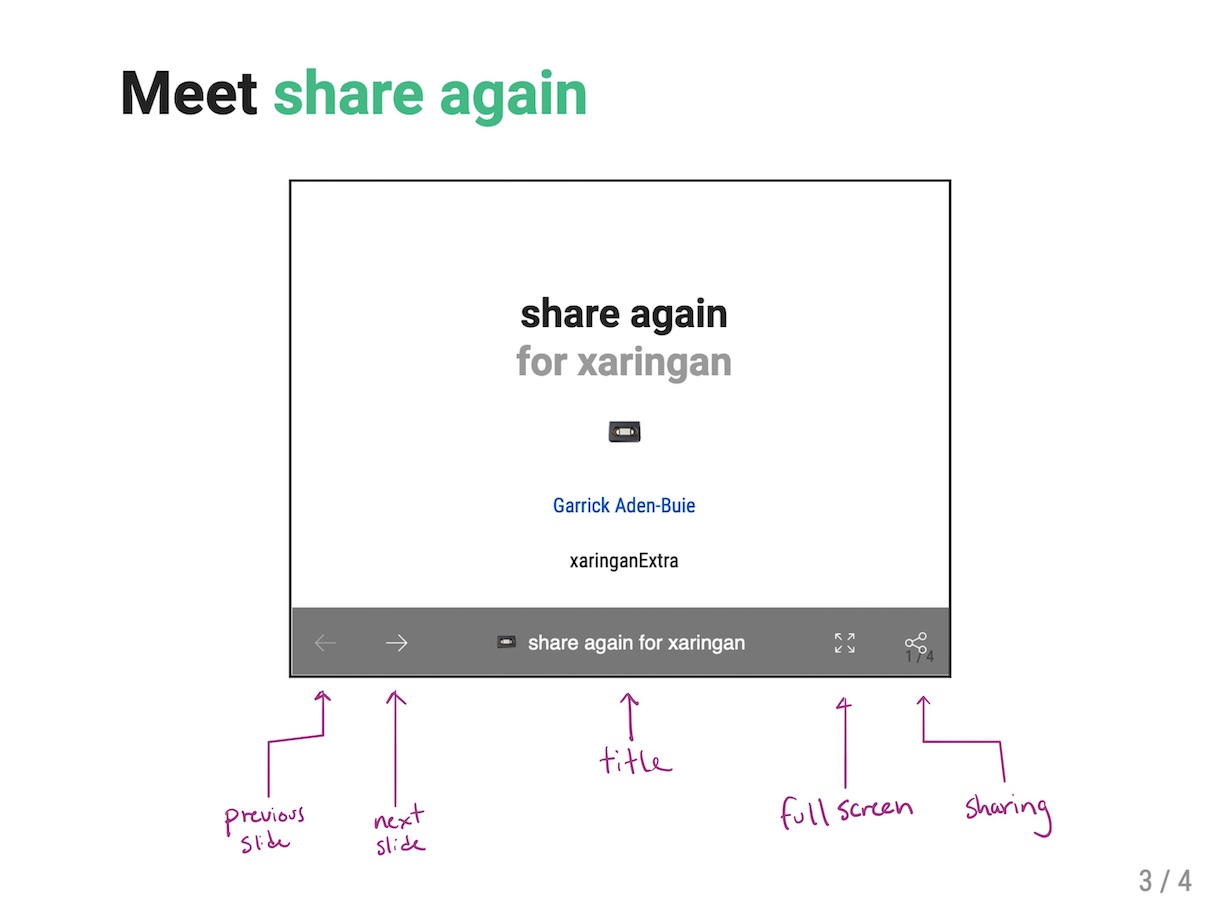
]Share your slides in style with share again! It adds a share bar to your slides that only shows up when they’re embedded in another page. The bar adds easy slide navigation, quick access to full screen views, and a share menu for one-click (or tap!) sharing on social media sites.
Add share again to your slides in three easy steps.
Add use_share_again() to your slides
```{r share-again, echo=FALSE}
xaringanExtra::use_share_again()
```
Style your share bar and choose social media sites
```{r style-share-again, echo=FALSE}
xaringanExtra::style_share_again(
  share_buttons = c("twitter", "linkedin", "pocket")
)
```
Embed your slides in blogdown or R Markdown websites
```{r embed-xaringan, echo=FALSE}
xaringanExtra::embed_xaringan(url = "share-again.html", ratio = "4:3")
```
embed_xaringan() works with any xaringan presentation,
share again not required!
Here’s what your slides will look like in an R Markdown HTML document.
Broadcast lets others follow along, in real time! Built with PeerJS, broadcast give you a unique URL to share with your viewers. Then, when they load your slides, their slides will automatically follow you as you present!
To equip your slides with broadcast capabilities, add the following
chunk to your slides’ .Rmd file.
```{r broadcast, echo=FALSE}
xaringanExtra::use_broadcast()
```
Then, host your slides online, either on a personal webpage, or through Netlify, GitHub Pages, GitLab Pages, or another service.
When you want to present, open the version of your slides hosted online in a modern browser. Then press P to enter the presenter view. Click on the Broadcast button to start broadcasting.

After a short moment, if everything works, the broadcast button will turn into a broadcast link. Share this link with your audience. When they open the link, their browser will connect with yours and from then on, whenever you advance or change slides, your viewer’s slides will move to the current slide.
Note that the broadcast link is unique and, as the presenter, is remembered for 4 hours. After 4 hours of inactivity, a new link will be generated. In general, create and share the broadcast link just before or as your event starts and certainly not more than an hour before the presentation.
PeerJS creates a direct, peer-to-peer connection between your browser and your viewer’s browsers. A third party PeerJS server is used to initially facilitate the connection using the broadcast ID to connect with the presenter’s browser.
After the connection is made, data is sent directly between browsers and the PeerJS server is no longer involved. Furthermore, at no time is any information about your presentation transmitted over the network. When you move to a slide, say for example slide 11, broadcast announces “Slide 11” to any connected viewers and JavaScript in their browser moves their presentation to slide 11.
This has two consequences:
Viewers can move around and look at slides other than the one currently active in the presenter’s browser. When the presenter changes slides, however, all viewers’ slides will move to the new slide.
If your slides involve interactivity, such as htmlwidgets or [panelset], changes made in the presenter’s view aren’t replicated for viewers. Viewers will be taken to the same slide as the presenter, but they will need to click on their own to follow interactively.
It’s worth mentioning a few details. First of all, the broadcaster needs to be connected first before viewers connect. If a viewer connects before the broadcaster starts (or restarts), they should reload the link to reconnect.
Similarly, if the broadcaster reloads their slides, viewers will also need to reload to reconnect. But once everyone is connected, a message will appear for the viewer to prompt them to reconnect.
If you are the presenter and you load the broadcast link, the
broadcast will automatically reconnect and start broadcasting. If you
want to view your slides without broadcasting, just load the plain URL
for the slides without the ?broadcast=... portion. From
this view, you can restart the broadcast from the presenter view and if
the broadcast ID is still valid that ID will be used. To reset the
broadcast ID without waiting 4 hours, load your slides with
?broadcast=1 and new broadcast link will be created at the
next broadcast.
Scribble lets you draw on your xaringan slides. Click the pencil icon or press S to begin drawing. Pressing S or starting the drawing mode toggles the scribble toolbox. There, you’ll find the eraser button, which helps you remove lines from your drawing. Or click the trash button to clear the drawings on the current slide.
```{r xaringan-scribble, echo=FALSE}
xaringanExtra::use_scribble()
```
Your drawings stay with each slide when you change slides. Note that you won’t be able to change slides while you’re in drawing mode. In fact, you can use the ← and → keys to undo or redo your drawings.
Remember that if you use slide continuations to partially reveal slide contents, each partial slide is technically a brand-new slide as far as xaringan is concerned. This means that each partial slide will have it’s own drawing layer and your drawings on one slide won’t carry over to the next. (But they’ll still be there when you switch back!)
To save a copy of the slide with your drawings, your best option is to print your presentation from the browser.
Slide tone plays a subtle sound when you change slides. It was requested by a blind R user and enables users to hear an auditory signal of their progress through the slides.
The tones increase in pitch for each slide from a low C to a high C note. The tone pitch stays the same for incremental slides.
Visit the slide tone demo slides to experience it yourself. Or include slide tone in your next xaringan presentation by adding the following code chunk to your slides’ R Markdown.
```{r xaringan-slide-tone, echo=FALSE}
xaringanExtra::use_slide_tone()
```Animate.css is a popular collection of CSS animations. It contains
a bunch of cool, fun, and cross-browser animations for you to use in your projects. Great for emphasis, home pages, sliders, and general just-add-water-awesomeness.
Use use_animate_css() to include the animate.css
stylesheets in your slides. This function automatically modifies the CSS
selector that enables the animation so that only the slides that are
visible are animated. This drastically improves performance on large
slide decks with many animations. For use in other HTML documents, set
xaringan = FALSE to load the default
animate.css file without this performance tweak.
To use animate.css in your slides, add the following code chunk to your slides’ R Markdown.
```{r xaringan-animate-css, echo=FALSE}
xaringanExtra::use_animate_css()
```
Then add the animated class and the desired animation
class to the slides you want to animate. Out animations
are only applied to slides on exit.
---
class: animated slideInRight fadeOutLeft

## This slide...

- slides in from the right
- and fades out to the left on exit
If you want to use the same slide transitions for all slides, you can
use use_animate_all(). This function sets a default in and
out animation for all slides. Animations can be disabled for individual
slides by adding the class no-animation to the slide.
```{r xaringan-animate-all, echo=FALSE}
xaringanExtra::use_animate_all("slide_left")
```
Note: because use_animate_all() only imports the CSS
required for the slide in and slide out animations, you need to also
include use_animate_css() (see above) if you want to use
other animations from animate.css in your slides.
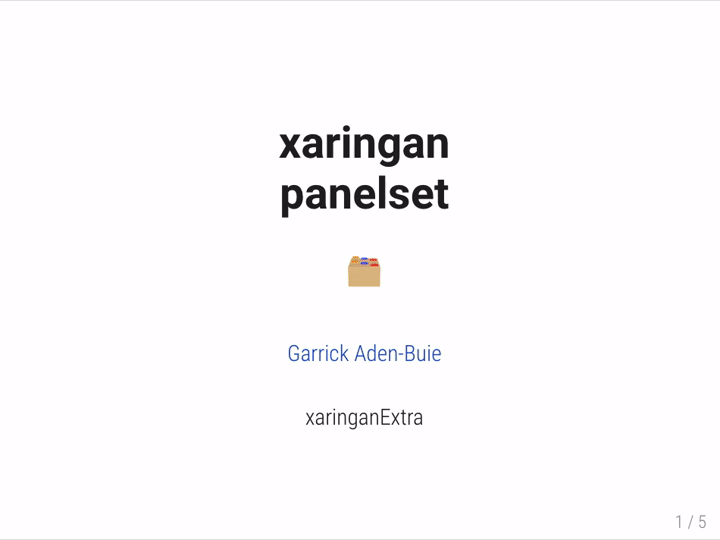
Panelset adds accessible tabbed panels — just like R Markdown’s
.tabset panels — to your xaringan slides. You can activate
a panel by clicking on the tab, or you can use the keyboard. When you
reach a slide with a panelset, the left and right arrows will step
through the panels.
To use panelset, add the following chunk to your slides.
```{r xaringan-panelset, echo=FALSE}
xaringanExtra::use_panelset()
```
Then, create a .panelset[...] that contains
.panel[]s. Each .panel[] should have a
.panel-name[] and content (everything that isn’t the
panel’s name).
.panel[.panel-name[NAME]
...content...
]
Here’s the example used in the demo slides.
.panelset[
.panel[.panel-name[R Code]
```{r panel-chunk, fig.show='hide'}
# ... r code ...
```
]
.panel[.panel-name[Plot]

]
]As an alternative to the “tabs above content” view, you can also use sideways panelsets where the tabs appear beside the tabbed content.
To choose this effect, add the .sideways class to
.panelset in your slides or R Markdown text.
.panelset.sideways[
.panel[.panel-name[ui.R]
```r
# shiny ui code here...
```
]

.panel[.panel-name[server.R]
```r
function(input, output, session) {
  # shiny server code here...
}
```
]
]
By default in sideways-mode, the tabs will appear on the left side.
You can choose to place the tabs on the right side by including both
.sideways and .right with
.panelset.
.panelset.sideways.right[
.panel[.panel-name[ui.R]
```r
# shiny ui code here...
```
]

.panel[.panel-name[server.R]
```r
function(input, output, session) {
  # shiny server code here...
}
```
]
]Example R Markdown output with panelset
Panelset works in all R Markdown HTML outputs like HTML reports and blogdown webpages!
Panelset works in the same way as rmarkdown’s tabset
feature, albeit with fewer style options, but the trade-off is that it
works in a wider range of document types. Generally, as long as the
output is HTML, panelset should work.
Another advantage of panelset is that it enables deeplinking: the currently shown tab is encoded in the URL automatically, allowing users to link to open tabs. Users can also right click on a panel’s tab and select Copy Link to link directly to a specific panel’s tab, which will appear in view when visiting the copied link.
With standard R Markdown, i.e. rmarkdown::html_document(), you can use the following template.
# Panelset In R Markdown! {.panelset}

## Tab One

Amet enim aptent molestie vulputate pharetra
vulputate primis et vivamus semper.

## Tab Two

### Sub heading one

Sit etiam malesuada arcu fusce ullamcorper
interdum proin tincidunt curabitur felis?

## Tab Three

Adipiscing mauris egestas vitae pretium
ad dignissim dictumst platea!

# Another section

This content won't appear in a panel.
In other, less-standard R Markdown HTML formats, you can use pandoc’s fenced divs.
::::: {.panelset}

::: {.panel}
[First Tab]{.panel-name}

Lorem sed non habitasse nulla donec egestas magna
enim posuere fames ante diam!
:::

::: {.panel}
[Second Tab]{.panel-name}

Consectetur ligula taciti neque scelerisque gravida
class pharetra netus lobortis quisque mollis iaculis.
:::

:::::
Alternatively, you can also use raw HTML.
<div class="panelset">
  <div class="panel">
    <div class="panel-name">First Tab</div>
    <!-- Panel content -->
    <p>Lorem ipsum, etc, etc</p>
  </div>
  <div class="panel">
    <div class="panel-name">Second Tab</div>
    <!-- Panel content -->
    <p>Lorem ipsum, etc, etc</p>
  </div>
</div>To customize the appearance of your panels, you can use
style_panelset_tabs() called directly in an R chunk in your
slides.
```{r echo=FALSE}
style_panelset_tabs(foreground = "honeydew", background = "seagreen")
```
The panelset uses opacity to soften the in-active tabs to increase
the chances that the tabs will work with your slide theme. If you decide
to change your tab colors or to use solid colored tabs, you’ll likely
want to set inactive_opacity = 1 in
style_panelset() (or the corresponding
--panel-tab-inactive-opacity CSS variable).
Behind the scenes, style_panelset_tabs() updates the
values of custom CSS
properties that define the panelset appearance. If you’d rather work
with CSS, the default values of these properties are shown in the CSS
code below. You can copy the whole CSS block to your slides and modify
the values to customize the style to fit your presentation.
```{css echo=FALSE}
.panelset {
   --panel-tab-foreground: currentColor;
   --panel-tab-background: unset;
   --panel-tab-active-foreground: currentColor;
   --panel-tab-active-background: unset;
   --panel-tab-active-border-color: currentColor;
   --panel-tab-hover-foreground: currentColor;
   --panel-tab-hover-background: unset;
   --panel-tab-hover-border-color: currentColor;
   --panel-tab-inactive-opacity: 0.5;
   --panel-tabs-border-bottom: #ddd;
   --panel-tab-font-family: Menlo, Consolas, Monaco, Liberation Mono, Lucida Console, monospace;
}
```A common use-case for panelset is to show the code and its output in separate tabs. For example, you might want to first show the code to create a plot in the first tab, with the plot itself in a second tab. On slides where space is constrained, this approach can be useful.
To help facilitate this process, panelset provides a
panelset chunk option. When set to TRUE, the
code is included in a panel tab named Code and the output is
included in a panel tab named Output. Note that you still need
to wrap this chunk in a panelset-creating container.
.panelset[
```{r panelset = TRUE}
list(
  normal = rnorm(10),
  uniform = runif(10),
  cauchy = rcauchy(10)
)
```
]
You can also set the panelset chunk option to a named
vector, where the source item is the tab name for the
source code and the output item is the tab name for the
code output.
```{r panelset = c(source = "ggplot2", output = "Plot")}
ggplot(Orange) +
  aes(x = age, y = circumference, colour = Tree) +
  geom_point() +
  geom_line() +
  guides(colour = FALSE) +
  theme_bw()
```
When your code contains multiple expressions and outputs, you may
also want to set the results = "hold" chunk option.
Currently, knitr uses results = "markup" as the default, in
which case each code expression and output pair will generate a pair of
tabs.
```{r panelset = TRUE, results="hold"}
print("Oak is strong and also gives shade.")
print("The lake sparkled in the red hot sun.")
```
Finally, panelset chunks also work in R Markdown documents, but they
must be encapsulated in <div class="panelset"> and
</div>
<div class="panelset">

```{r panelset = TRUE}
print("Oak is strong and also gives shade.")
```

</div>
or appear inside a section with the panelset class.
### A Random Sentence {.panelset}

```{r panelset = TRUE}
print("Oak is strong and also gives shade.")
```use_logo() adds a logo to all of your slides. You can
make the logo a clickable link and choose where on the slide it is
placed. You can also set which types of slides will not get the logo by
default.
To add a logo to your xaringan presentation, add the following code chunk to your slides’ R Markdown file.
```{r xaringan-logo, echo=FALSE}
xaringanExtra::use_logo(
  image_url = "https://raw.githubusercontent.com/rstudio/hex-stickers/master/PNG/xaringan.png"
)
```
See the documentation for ?use_logo for more options
regarding sizing and positioning. You can also make the logo a link
using link_url and you can hide the logo for a particular
slide by using the hide_logo slide class.
use_banner() adds a banner to the top or the bottom of
your slides. Use banner to add the title of your talk, a link to your
materials online, or any other text to every slide. Each banner has
three columns: left, center, and right. Choose to exclude
the banner from particular slides by class.
```{r xaringan-banner, echo=FALSE}
xaringanExtra::use_banner(
  top_left = "My Awesome Talk Title",
  top_right = "Mr. Fancy Pants",
  bottom_left = "bit.ly/my-awesome-talk",
  exclude = "title-slide"
)
```
Banners are fully customizable and can be styled based on slide
class, although the defaults will generally work in most places. See
style_banner() for full details!
Brings remark.search to
xaringan slides! Call use_search() to add
search to your slides and to choose your options.
```{r xaringanExtra-search, echo=FALSE}
xaringanExtra::use_search(show_icon = TRUE)
```| Parameter | Description |
|---|---|
position |
Where to place the search box. |
case_sensitive |
If FALSE, ignores case of
search and text. |
show_icon |
Show the icon to open or close the search? |
auto_search |
Search on each keystroke
(TRUE) or on enter (FALSE)? |
In your slides, press Control + F to start
searching, or click on the search icon 🔍 if you set
show_icon = TRUE. Press Enter to jump to the
next match.
To change the appearance of the search box, use
style_search():
```{r xaringanExtra-search-style, echo=FALSE}
xaringanExtra::style_search(match_background = "pink")
```| Argument | Description |
|---|---|
icon_fill |
Color of search icon |
input_background |
Color of search input box background |
input_foreground |
Color of text in search input box |
input_border |
Border style of search input box |
match_background |
Color of match background (not current) |
match_foreground |
Color of match text (not current) |
match_current_background |
Color of current match background |
match_current_foreground |
Color of current match text |
selector |
CSS selector specifying which search bar to update (for advanced or unusual uses only) |
Tachyons is a collection of CSS utility classes that works beautifully with xaringan presentations and the remarkjs class syntax.
To use tachyons in your slides, add the following code chunk to your slides’ R Markdown.
```{r xaringan-tachyons, echo=FALSE}
xaringanExtra::use_tachyons()
```
Tachyons provides small, single-purpose CSS classes that are easily
composed to achieve larger functionality and styles. In the remarkjs
content classes syntax, you can compose classes by chaining them
together. For example, the following markdown produces a box with a
washed green background (.bg-washed-green) and a dark green
border (.b--dark-green) on all sides (.ba)
with line width 2 (.bw2) and border radius
(.br3). The box has a shadow (.shadow-5) and
medium-large horizontal padding (.ph4) with a large top
margin (.mt5).
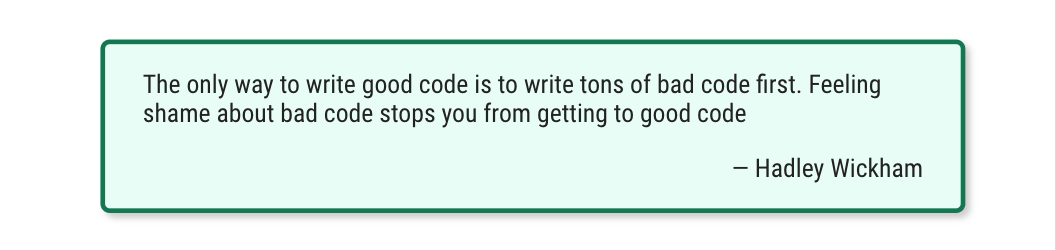
.bg-washed-green.b--dark-green.ba.bw2.br3.shadow-5.ph4.mt5[
The only way to write good code is to write tons of bad code first.
Feeling shame about bad code stops you from getting to good code

.tr[
— Hadley Wickham
]]
Tachyons provides hundreds of CSS classes that are abbreviated and terse, so it takes some time to learn. In addition to the tachyons documentation, the Tachyons Cheatsheet is an excellent and easy to use reference.
Add a live video of your webcam into your slides (in your own browser only). Useful when you are presenting via video conference to include your video, or when you are recording a class or lecture.
To add webcam to your xaringan presentation, add the following code chunk to your slides’ R Markdown file.
```{r}
xaringanExtra::use_webcam()
```
Inside your slides, press w to turn the webcam on and off, or press Shift + W to move the video to the next corner. You can also drag and drop the video within the browser window.
The webcam extension is based on the original webcam implementation by Yihui Xie, author of xaringan.
FreezeFrame starts any gifs on a slide when you turn to that slide. This helps alleviate the awkward pause that can happen when you turn to a slide with a gif that has already started and you have to wait until it loops back around. You can also directly click on the gif to stop or start it. Built using freezeframe.js.
To add FreezeFrame to your xaringan presentation, add
the following code chunk to your slides’ R Markdown file.
```{r xaringanExtra-freezeframe, echo=FALSE}
xaringanExtra::use_freezeframe()
```| Argument | Description |
|---|---|
| selector | The selector used to search for
.gifs to freeze. |
| trigger | The trigger event to start animation for
non-touch devices. One of "click" (default),
"hover" or "none". |
| overlay | Whether or not to display a play icon on
top of the paused image, default: FALSE. |
| responsive | Whether or not to make the image
responsive (100% width), default: TRUE. |
| warnings | Whether or not to issue warnings in the browser console if an image doesn’t appear to be a gif. |
Add a “Copy Code” button for one-click code chunk copying.
To add clipboard to your xaringan presentation or R Markdown document, add the following code chunk to your slides’ R Markdown file.
```{r xaringanExtra-clipboard, echo=FALSE}
xaringanExtra::use_clipboard()
```
You can also customize the text that is shown by default when
hovering over a code chunk with the button_text argument.
Use success_text to specify the text shown when the copy
action works, or error_text for the text shown when the
copy action fails. If the copy action fails, the text will still be
selected, so the user can still manually press Ctrl+C to
copy the code chunk.
These options accept raw HTML strings, so you can achieve an icon-only appearance using FontAwesome icons:
```{r xaringanExtra-clipboard, echo=FALSE}
htmltools::tagList(
  xaringanExtra::use_clipboard(
    button_text = "<i class=\"fa fa-clipboard\"></i>",
    success_text = "<i class=\"fa fa-check\" style=\"color: #90BE6D\"></i>",
    error_text = "<i class=\"fa fa-times-circle\" style=\"color: #F94144\"></i>"
  ),
  rmarkdown::html_dependency_font_awesome()
)
```
clipboard works in xaringan slides, R Markdown documents, blogdown sites, and Shiny apps!
Related projects: For related R packages that provide copy support via clipboard.js see
xaringan/remark slides scale at a consistent ratio when the browser
window is resized. In other words, if the slide ratio is
4:3, then remark scales the slides and positions them in
the browser window so that they maintain the aspect ratio.
In certain situations, like when showing slides in split screen next to another window like RStudio, this causes the slides to become rather small. Alternatively, it’s a great way to be able to adapt your slides to the aspect ratio of the projector or television screen when you don’t know the ratio ahead of time.
This extension adds a short cut key — Alt/Option+ F — that fits the slides to the screen and ignores the slide ratio. (Currently, it only turns on; reload your slides to return to normal.)
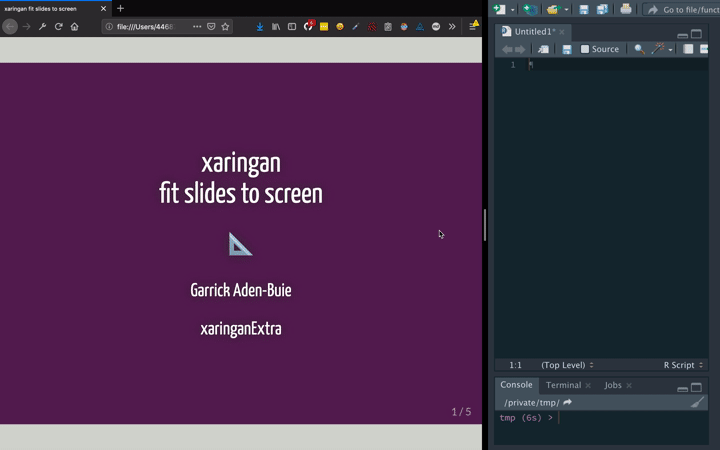
```{r xaringan-fit-screen, echo=FALSE}
xaringanExtra::use_fit_screen()
```I’ve collected a few CSS extras that I like to include in my slides,
that I’ve bundled up into the use_extra_styles()
function.
```{r xaringan-extra-styles}
xaringanExtra::use_extra_styles(
  hover_code_line = TRUE,         #<<
  mute_unhighlighted_code = TRUE  #<<
)
```
hover_code_line adds a little floating triangle next
to the hovered line in a code chunk
mute_unhighlighted_code modifies the
xaringan/remarkjs line highlighting to mute the lines that aren’t
highlighted.

You can also add an animated progress bar using
xaringanExtra::use_progress_bar().
```{r xaringanExtra, echo = FALSE}
xaringanExtra::use_progress_bar(color = "#0051BA", location = "top")
```
color can be any CSS color
location can be "top" or
"bottom"
height can be a valid CSS unit,
e.g. 10px or 0.25em